INVERTED SKY
Plan:
The plan for this shoot is to photograph contrasting areas of the sky in order to perform a digital composite series that focus in slicing and inverting images. Hence the series is called "Inverted Sky" . The shoot will be done on my canon 5d mk1 with a 7-300mm lens for the zoom
Research influences
AO1:
I conducted research into 2 artist for this shoot, one of which who is a photographer the other a portrait artist.
From my experimentation in the proprietary shoots the work of Amanda Clyne who is an artist that composes portrait by slices that creates heavy distortion and adds a different visual element to the piece.
Amanda Clyne was a corporate lawyer who, after the trauma of 9/11, left her New York firm to become a painter. She studied at the School of Visual Arts in New York before graduating with the Drawing and Painting medal from OCAD University in 2009. In 2014, Amanda completed her MFA (Visual Arts) from York University. Her work has been featured in many publications and blogs, including New York's Hyperallergic blog, Canada's Flaremagazine and Italy's L'Espresso. Most recently, she was awarded an Ontario Arts Council Emerging Artist Grant. Her work has been exhibited in Europe, the U.S. and across Canada and is in the corporate collections of such companies as Mercedes Benz, Holt Renfrew and Astra Zeneca.
 Her work interests me as you have
to really look hard at her pieces and take time to put together the pieces of the puzzle as such.
we can see that the painting is separated into many thin irregular strips, that when composed together form an intricate technical piece of art.
I feel her work is very strong in terms of creativity and abstractism as it brings a different compositional dynamic to just normal photography or artwork that is usually very mundane and repetitive. However her work allows the audience to explore different themes and perspectives when viewing her pieces as a result of these slices creating optically illusions. and this is why her work influences me so much and the outcomes of this shoot.
Her work interests me as you have
to really look hard at her pieces and take time to put together the pieces of the puzzle as such.
we can see that the painting is separated into many thin irregular strips, that when composed together form an intricate technical piece of art.
I feel her work is very strong in terms of creativity and abstractism as it brings a different compositional dynamic to just normal photography or artwork that is usually very mundane and repetitive. However her work allows the audience to explore different themes and perspectives when viewing her pieces as a result of these slices creating optically illusions. and this is why her work influences me so much and the outcomes of this shoot.

From Clyne's artwork, I am looking to adopt the similar technique of image slicing. This instead of physically will be done digitally in the photo manipulation program Photoshop. The photographs taken for this shoot will again be focusing on the clouds and especially areas of the sky that have high contrast and cloud detail, which in my further editing will allow me to explore a more abstract route of digital composite images.
Images sourced from:
https://www.amandaclyne.com
The second photographer i have conducted research into and who has influenced my work is Jérémy Tourvieille. Tourvieille is a specialist in creating digital composites and explore themes of models through his photographs which he then produces these artworks from.
Although similar to Clyne and her work, the use of black and white and the style of editing that Tourvieille carries out, is very different.
 The image to the right shows a model face and shoulder which seems pretty normal, however when looking deep we can deduce the composition is not just a single face but 3 in total. The incorporation of the 3 images distorts the focus and the original image which had been layered over. The distortion in this image may connote to the distortion of beauty and body image through the media. As well as this it may hint to the distortion of the mind and mental health, the 3 faces describing 3 different personalities or mind sets present within a person and how these cannot be controlled. This is why is feel that Tourvieille's images are so strong and also meaningful.
From this series entitled "mapping" I am going to explore the ideas of layering in compositions and the use of inversion which is an idea I have developed from viewing his black and white images.
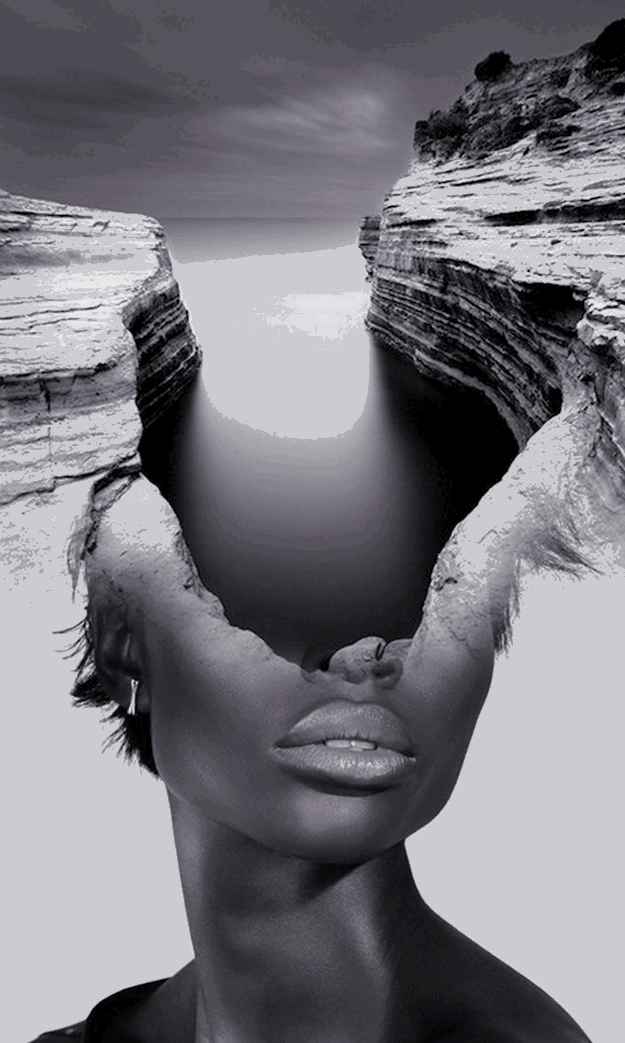 This image on the right is in black and white and a digital composite image, however what interests me as a fanatic of digital composition is the way he has so smoothly performed a composition with such an irregular shape and stitched it so well with something as delicate as the human face.
As clouds are very irregular and random I am going to explore the addition or irregular stitching as well as just strips in my composite images. This may help in the better perception of depth and like the images to the right. Additionally i feel that these composite images are not only fun the create due to their abstract nature but viewing them from and audience perspective for me is one of the best parts. This is because to the normal mind and eye they look so surreal and impossible yet in digital programs we are able to do so. therefore the audience is left feeling puzzled as well as respectful and mindful of the work gone into producing such an image.
This image on the right is in black and white and a digital composite image, however what interests me as a fanatic of digital composition is the way he has so smoothly performed a composition with such an irregular shape and stitched it so well with something as delicate as the human face.
As clouds are very irregular and random I am going to explore the addition or irregular stitching as well as just strips in my composite images. This may help in the better perception of depth and like the images to the right. Additionally i feel that these composite images are not only fun the create due to their abstract nature but viewing them from and audience perspective for me is one of the best parts. This is because to the normal mind and eye they look so surreal and impossible yet in digital programs we are able to do so. therefore the audience is left feeling puzzled as well as respectful and mindful of the work gone into producing such an image.
To develop my work since the proprietary shoots I am going to edits that use complex techniques and refinements that i have previously not attempted however and therefore depicting my development as a artist by creating my own style of photography
Images sourced from:
https://www.facebook.com/jtourvieille
My final outcomes in A04 are linked to my research rather than my straight images as I am exploring digital composite techniques that cannot be shot RAW but are edits.
contact sheets:


Straight images:
· AO2:
Camera settings:
the camera was set to a high f stop of 32 so that the whole image was crisp and clear, also to minimise the glare and the exposure as the sun was behind the parts of the sky i was shooting
EDITS:
For my development I decided to carry out series of digital composites that in corporate the techniques of images slicing, dodging and burning, inversions, layering and using various Photoshop functions to create my desired series of "Inverted sky".
Image 1:
I chose this raw image as a result of the high contrast areas between the blue of the sky behind the grey scale of clouds which I think works well when inverted.
 For this edit (the first) I felt that the images was already good enough and performing extensive editing into it would ruin the final outcome. As a result of this the only changes I made to the original image in terms of tonal range, exposure and colour where those done in adobe camera RAW. I took the images all in RAW formats as those files hold a great amount of detail that allow a larger scope for detailing and holding information (photographic data) that i could need when editing like shadows or highlights. I did have to use the stamp tool and cover up the slight lens flare to left centre on the bottom of the image.
I begun the main edit by using the ruler function to mark out equidistant lines both horizontally and vertically. after doing so at every 1/2 of on the markers, I began to select alternate columns using the +select tool that allows new selections to be added to the current. Following this procedure I put all the selected columns onto ta new layer and used the Ctrl I function to invert them producing the final image (labled Ii in A04)
This image was an formed of the combination of the slicing i have research conducted by Amanda Clyne with colour bu then using Tourvieille's use of black and white, in my case inversions and a contrasting dynamic
Image 2:
Similarly to this the previous image I have chosen this image for it contrasting sections. This image however has a large space centrally in the composition, due to my research and development i know when inverted the contrast at this point would create a focal element. This would mean that it will have an overall stronger composition to me and the effect of the inversion will clearly visible.

 Again I started out by creating my guide lines, as visible there are a few sets at different distances, the is because I tried to do a variation of slice sizes however I was not overall happy with he final outcome therefore I went back and deletes the rest of the guides I didn't need. The other layers you can see are a set of curves. By programming one curve layer "lighter" and the other layer "darker" by adjusting the curve of the graph; you are then able to use the dodging and burning technique. By using this technique I was able to highlight areas of the images like the feathered edges of clouds and other areas to bring out definition in conjunction with darkening areas that where overexposed. After doing this the slices where then cut like the technique about but to develop the theme I used the transform tool tool resize some slice and stagger them up and down to create a difference affect. This is why some areas don't match and others do.
(IIi in A04 see below)
Image 3:
By far image 3 is my most edited image which was inspired by the movement of clouds in relation to the slicing and layering of both Tourvieille with his 3 image layering and Clyne with irregular slicing this time. These images of which are 3, taken for their increase amount of cloud texture. each images posses unique cloud formations which have abstract features that i have tried to exploit
The images where layered on top of each other with minor spot healing carries out for dust on the lens and saturation for the colour correction of the blue so that all the images differed. After this the bottom and top layers where inverted and the opacity was tweaked so that I can extract the features of each layer.

After assessing the image at this point I felt it lacked vibrancy and colour therefore i layered another images into the composition placing it as the first layer so that the blue hues created in adobe camera RAW can com through. This was done by selecting the tungsten colour filter and tweaking exposure.

This is what the images looked like after all these processes had been carried out.
After this I created the curves layers again so I can burn and dodge using the brush tool to create accentuated highlights and shadows for detail purposes.

Moving on from this point the final image created was flattened and I began to cut thin regular strips which I put onto a new layer.
to make this differ I though about introducing the aspect of movement in the image as clouds are moving artefacts of the sky. I used the smudge tool and lowered its strength to achieve smooth smudges in the directions that the clouds where pointing. This gave the stripes motion blur that help the outer line and didn't distort the background.
When revealing the background layer this was the final outcome and it almost looks breathing cloud illusion which was the desired outcome.
(IIIi in A04)
Image 4:
The edit for this image is a similar style to that of the first image using the same techniques however relating back to the 2nd images if Jeremey Tourvieille that shows the irregular coastal cliff edited onto a woman face, I deiced to explore the irregularity of the clouds and how I can use that to explore this series of inversion so after creating the guides; they help with keeping everything precise when cutting and slicing as well as selecting. this is because I have switched on the snap on function after measuring and drawing the guides. this ensures that my selection stays precises to the guides and the selection stays exactly where I want it. I created horizontal slices to ad a different plane to this images as it seems refreshing compared to the other images.
 The image was developed further by using the magic wand tool you can see active in the image to the left. This allowed the computer to select areas of the clouds that I wouldn't have been able to by hand. With this function I chose various areas that I wanted to revert or invert to create a sense of increase depth. The effect that I achieved from this gives an ambiguity to which image is in front or behind and/if there is a significant distance between the 2. This gives the audience something to asses when viewing the photograph that will be almost like a persistent unforgettable thought; this could help in further exposure of my work as an artist and people remembering my work rather than forgetting the "normal" traditional photography of clouds people may see. This I feel is an import aspect of photography as I have now learn to develop myself as an artist and have a consistent style.
(IVi in A04)
A03:
My images link to my research from this shoot in variety of ways. This mostly is because of the similarity of techniques used to create my final outcomes.
This shoot went really well however i did have to adjust the camera settings due to the amount of light present due to the presence of the sun. But after the settings where dialled in the shoot went to plan and no hiccups where met along the way.
Although my images are not paintings they link to the work of Amanda Clyne. This is because she was my first influence in creating these digital sliced images after seeing her sliced portraits which in essence although are on a different artistic media, the style and composition of her artwork is heavily reflected in my final images due to the slicing of the original image and the reformatting of the final image.
However reflecting and evaluating my pieces I can see they seem very regular and repetitive as the slices have been created out of the same images to develop this further and to further link my images to the work of Clyne in the future I could compose an image from various slices taken from different images as she has done in many of her collections.
In relation to Jeremy Tourvielle my
work link mostly to his work and every image can be clearly associated with his series "mapping" and his distinct techniques have been involved into my images which I have been able to make my own by using the inversion function instead of colour scales or monotone compositions.
the images all have a meaning behind that expresses the distortion of the clouds. this for me connotes to the distortion that is portrayed in the media and as showcased by the cloud, which are irregular objects and like people all individual. It explores the theme of manipulation on what is the true colour and intent of a person? are they just acting the way they act as they are that way or is there an alternate motive. The cloud could be inverted or not who knows, it was about creating that illusion for the eye; eye can only see but cannot tell you the truth from the lie...
AO4: SHOOT BEST IMAGES (editied)
Ii
IIi
IIIi
IVi
·


